After I realized that several things were going less-than-optimally, I decided (somewhat painfully) to start over again, from the design.
I widened the bow and stern entries on the design, so that I can actually strip to the forms. I also reduced the upturn of the ends, so I don't have to deal with such a "mad" curve.
I'm going to use an internal stem this time, because I don't like joining the ends of the strips past the bow & stern. It also prevents the mistake of gluing the form to the boat.
I'm probably not going to have enough strips, but I can deal with making more strips easier than I can deal with the number of mistakes that have piled up.
I went back into Kayak Foundry, and reshaped the bow & stern entries to be a little less "fine". I wondered if I could re-use the middle forms, then thought better of it, and remade all the forms. As I expected, forms 1 and 15 came out wider.
Planning an internal stem posed a problem-how to mark the taper? In the past, the plan had included a convenient line. This time, I used a strip long enough to span forms 1 and 2, or forms 14 and 15 to gauge the taper, making sure that it would run fair off the end of the stem. The taper I ended up with looked good, quite a bit like the taper of my Outer Islands.
A new way of dealing with the "cheater" strips occurred to me.
I glued in one full-length strip, with a little curve at the ends, and let it run straight out the end.
I then filled the gap with Cheater Strips. This was much easier than the way I used to do it-putting the cheaters down first, then the full-length strips on top. I wish I had thought of this years ago!
The Usual Stuff, except that I'm discovering that things that look "cool" on Kayak Foundry aren't quite as "cool" on the strongback. I now wish I hadn't made the bow entry so sharp.
It occurred to me that I don't necessarily have to strip slavishly to the forms on my own design, but I have to strip symmetrically and workably.
I how also wish that I had made the bow & stern forms with an internal stem, like the Outer Island. I forgot what a pain it is to join the ends of the strips. I'm not following those forms exactly.
In fact, I'm accumulating so many should-haves that I'm considering starting all over, from the design.
This went somewhat easier than last year, since I was able to re-use the old box beam sections. I used two 8' sections, pulled about 1' apart, to make a 17' box beam. This takes up much less room in the basement than a 20' box. I was even able to re-use the vertical brackets.
I like the two-string system, because it gives me much more confidence in the alignment, and I like the way that the bottom string is longer that the entire boat.
The usual "outriggers" for planing strips.
I used these little support brackets again, at the ends. The Bow & Stern sections weigh pounds each, and need support.
I bought cedar & pine at Beard Lumber Company, bought too much, and got gypped. The price of cedar has gone through the roof, due to wildfires in California (kind of reminds me of the way oil goes up when "anything" happens) and I paid a small fortune. Ah well, shake it off...
The resawing went about the way it usually does, except that I discovered a few things shaky about my setup. I made two hefty new feather boards. I believe that I can reliably make two 3/16 boards out of a 3/4" board without screwing it up too much.
Planing is tedious, but effective. I will actually try to save the leftover planed boards for the (inevitable) next build.
I had noticed a little bit of a separation where the skeg trunk comes into the hull, so I dabbed a bit of epoxy on it, and continued to use the kayak.
I noticed that the gap had increased somewhat, so I brought the boat downstairs to take a look.
WOW. When I pried at the gap, I could see that the damage was extensive. It seemed that I peeled away water-soaked plywood until only a skin of veneer, and the fiberglass on the outside remained.
I wondered if it was worth it, if I should just take the box out somehow, and do without. I can barely reach it through the aft hatch, let alone work effectively with a heat gun at arm's length. A lot of work went into the thing, plus the potential of an ugly "plug" leaking itself, so I'm going to try to fix it.
10-9
I dug away seemingly endless shreds of moist wood, until I couldn't get any more out, and hit it with a hair dryer until it stopped smelling "wet". I cut a piece of 10 oz, and a piece of 4 oz. glass to the shape of the plywood, and then mixed some epoxy. First, I spread in a layer of dookie, then applied the 10 oz. glass, followed by more epoxy, and the 4 oz. glass. I hope I have the shreds incorporated into a sort of fillet.
While I was getting psyched up for this, I stripped the hardware from the boat. I figure I might as well store it that way, saving the trouble for next season's re-varnishing.
I hope this works, and I'm glad that I didn't take the skeg box out.
It seems that the problem was that the box really wanted to cave in & get narrower, despite being glued into place. Next year's box is made out of 1/4" marine okume, and I hope it holds up better.
Fairly routine, up to a point. Jigsaw, sanding wheel, and tons of dust.
I realized that the plan dimensions seem to place the forms 12" on center, and that I couldn't just stick forms 2 and 14 onto the bow & stern forms, so I cut a mortise 3/8" into those forms. Things lined up fairly well, except that the stems stuck out a little higher than the station forms. The split forms seemed to fall quite short of the end of the forms, until I sanded the taper. I also faired out the top of the forms, and checked all with a strip. I may yet have to improvise while stripping.
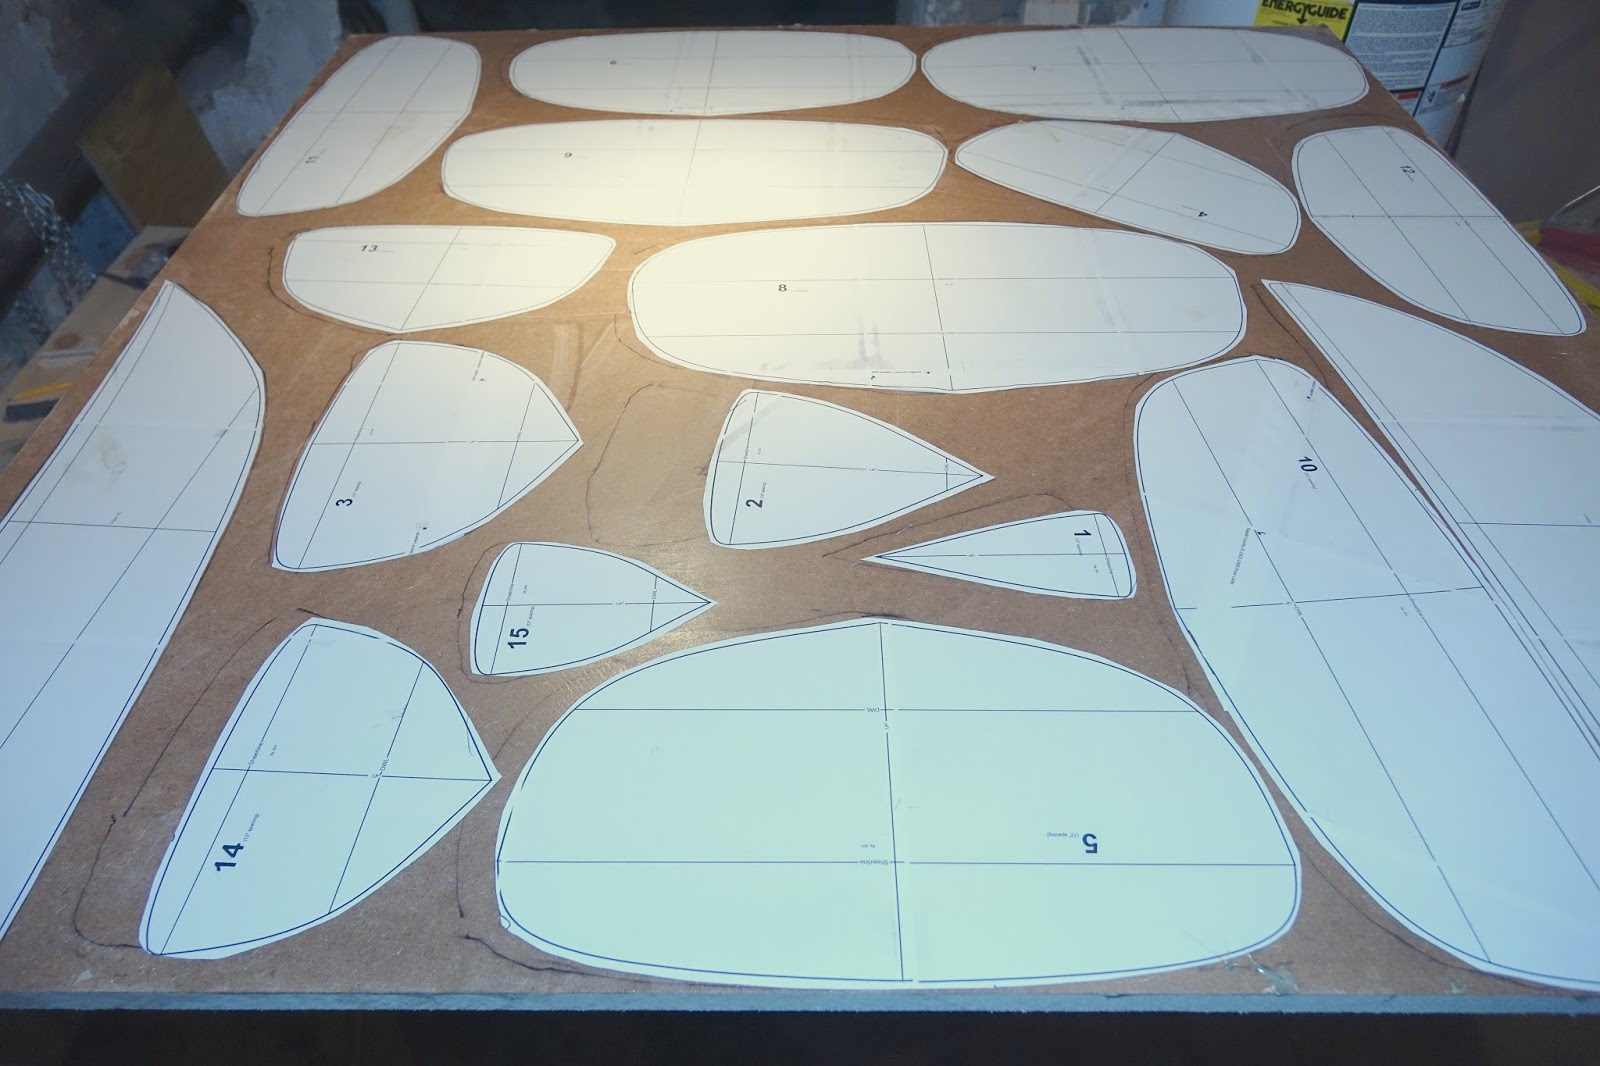
You can print the forms directly from Kayak Foundry. Since my printer only takes legal-size paper, it gives you most of the forms on several sheets of paper. with little target-shaped registration marks.
I used push pins to align the marks, and taped the pages together. Some of the biggest forms require as many as six sheets.
I used 3/4" MDF, and very stinky contact cement. All the forms fit on half a sheet.
After much tweaking, adjusting, messaging, and no small amount of frustration, I finally came up with this design on Kayak Foundry. It was a tug-of-war between technical specs and aesthetics-I came up with designs that looked nice, but had technical problems. I guess I will never know what its like until I build it.
Its been a while since I made a blog post about a kayak trip. I should do it more often.
Got today off from work. Set out from Harbor Park in Middletown.
Heading for the Arrigoni Bridge, site of a tragedy, and my vote for Homeliest Bridge In Connecticut. The entrance to the Mattabessett is just beyond the railroad bridge.
The Matt is a slow-moving tidal river. I soon got to a marshy area, and saw a lady in a small kayak. Had a chat, and paddled together. There is another put-in spot further up the river, and we paddled there together, where she took out.
After a pit stop, I continued up the river, looking for a couple of geocaches. The water level was getting low, and no luck on the caches, so I turned around, this time against the tide. Good paddle for wildlife: saw several Great Blue Herons, ducks, and fish.
I think that this was the longest actual paddle I've ever been on, in both mileage and time.
Normally, I wouldn't create a post about such a routine task, but this time I decided to try to remove all the old varnish. It was quite a task.
I am learning a lot here. First, I tried the "safer" citrus stripper on the hatch covers. It seems to attack the varnish all right, but it does so unevenly, and dries out quickly.
Back to the "brute force" approach-heavy sanding. You really can tell when you're through the varnish-the sanding dust changes from brown to white. After hand sanding, R.O.S. sanding, 220 grit, 400 grit, powerwashing, steel wool, and more powerwashing, I wish I had applied a heavier coat of epoxy three years ago! I did hit the glass weave in more places than I expected to. In all, I think it would have been better just to sand lightly. There was a not-unpleasant "old varnish patina" that is now gone.
After all that, I applied commercially-available adhesive rub strips to the bow & stern. I think they would look better on New Construction.
I used Epifanes varnish, first coat thinned 50% with the 333 thinner, and second coat 25%. It somehow seems to go on better than the Schooner.
I decided to break with tradition and try it out at Long Pond instead of the usual spot. It actually stopped raining today!
Weighed in at a svelte 39 lbs, and looked pretty sleek sitting on the grass. I gave it a go around the pond, trying to see if it was biased in either direction, and it doesn't seem to be. I discovered, to slight embarrassment, that I had no place to attach the paddle leash.
Interesting: I thought it might be silly to install a skeg on a boat like the Outer Island, but it seems effective, even on this boat.
I know I skipped a couple of steps: sanding and varnishing. These went routinely. I might have done a better job at these, but after all the builds, and refinishes, I' less fussy than I used to be. I know what it will look like after use, and I know I'll be varnishing it every year.
I decided that the only thing I want to mount on the foredeck is a GPS, so rather than to install deck webbing and contrive a way to hold the GPS, I broke down & bought a deck mount. I found an appropriate piece of foam for a gasket, and bolted it to the deck.
Deck rigging. I happened to put the aft hatch a little farther forward than usual, because I wanted to avoid interfering with the skeg. I was left with just enough room for the deck webbing.
I made the skeg control knob by laminating three pieces of lexan, left over from the skeg.
Toggle. The line isn't really manila.
Of the three ways that I know to build a cockpit coaming, laid-up plywood seems to be the simplest.
On my last two builds, I used the molded-fiberglass method. It works well, but its tedious, uses lots of epoxy, and the edge of the rim seems to come out kind of sharp, making it more difficult to pull the spray skirt off.
I briefly considered doing the lots-of-cove-and-bead-pieces method again, but I couldn't get psyched for the woodworking, so I went for the plywood. I got a half sheet of okoume, screwed up the cutting, and had to resort to cheaper stuff, but made it right with epoxy & filler.
This will be painted.
Paint job came out o.k. Side braces in place.
I glued in the skeg control box. This time, I managed to rout the opening out without hitting the box.
Hatches went as usual. Here, I'm trying some fairing filler:
I gave this a coat of green paint.
And, once again I managed to install the glue-on foot brace studs in the wrong position! Tough work removing them with the heat gun, smoothing the area out, etc. I originally put them in before joining the deck & hull, thinking that it would be very difficult to do by reaching into the cockpit, but it actually made it easier to screw up. It wasn't all that hard to reach through the cockpit, and next time, I'll do it that way.
Glassing the bottom of the deck went fairly routinely-I used the dookie-fill technique again, made the usual mess, and had an average number of drips come through to the other side.
I tried the fit of the deck on the hull and was astounded-it almost fit! The difference was only no more than 1/4" at worst. Still, I used spreader sticks to widen the hull a little.
I spot-glued with thickened epoxy, since there are some minor gaps. When the tape is removed, I'll do the whole joint with dookie.
I usually tack a 2" strip of 4 oz. glass to the inside of the joint before tacking the deck on, and saturate the glass later. The main problem with that technique is that it seems to take an enormous quantity of epoxy to saturate the glass down the length of the strip, and then it always wants to form a puddle in the middle. This time, I saturated 2 strips of 9 oz. tape, about 8" long, and applied them to the joints. It looked a very long way to the ends of the boat from the cockpit opening. I can do shorter strips in the bow & stern after the hatches are cut, if I want.
The deck glassed, with my friend The Osprey. I must have improved at fiberglassing, because this seemed faster & easier than ever.
I disassembled the box beam, and made two sawhorses, once again putting my Thule racks into service. The box beam had a tendency to disassemble itself, since its very heavy, and only nailed together with 4 d nails.
Sanding. It always seems like there is a very thick coating of epoxy everywhere, but I always manage to hit the fiberglass a few times. Figured something out: the 'blotchy" areas are where I'm sanding through multiple coatings of epoxy. They seem to wet out o.k. under varnish, however.
No matter what tools or techniques I use, sanding is still a tedious, messy job! ;)
I glassed the exterior of the hull today. I decided not to include a photo, because it wouldn't show much.
I learned a few new things about fiberglassing:
Warming the resin in a hot water bath helps it spread more easily, and it seems to saturate the glass faster.
Instead of struggling to make the glass fit the stern, I cut a "dart" and folded the ends. Makes things much easier, wonder why I hadn't tried this before.
The secret to avoiding ripples! Apply resin in an even coat, and skive off the excess as soon as the glass is saturated.
I gave the roller another try at one point, and gave up on it. I think that it only works well if a saturation coat has been applied to the wood, otherwise it just wants to lift the glass off the boat.
Instead of multiple layers, I decided on two strips of 10 oz. glass at the only places I've ever had a problem with abrasion: the bow & stern. it looks like they're going to need a lot of epoxy to fill.
I put a strip of 4 oz. glass over the 10 oz. to smooth out the job.
The skeg box opened. I think that I did this before glassing the hull last year-this time I did it after glassing the hull, and it seemed to go easier. I cut it a little deeper than I really wanted to, but this time, it looks straight.
I decided to sand the hull down to #220 wet paper before glassing the deck. I figured that it would be work, whether I did it now or later. I tried Nick's technique of using a doubled sheet of sandpaper, with no block, and it worked rather well. Sand, scrape, R.O.S, repeat, until its done.
Fairing the hull & deck went routinely, as in "tediously". I took a fairly aggressive approach, and a few spots came out rather thin.
I used my usual technique of applying putty to the seams, glass on wet putty, and saturating the glass. I tried applying the clear epoxy with a roller, and didn't like it. The glass saturates, but always seems to want to pull away from the wood. Maybe its because its on the interior, where the glass always wants to pull off anyway. I think it might work better on the exterior, where I can actually pour the resin onto the wood.
I tried gluing up blocks of cedar for the ends, but it proved to be more difficult than I remembered, so I fell back on the microbaloons:
Actually, I don't even know if this is quite necessary when I have internal stems. It is "supposed to" give you something to drill through for the carrying toggles, but it looks like I'd be drilling through the internal stems anyway. I kept it small.
About to glass the hull interior. I made a partition of trash bags to try and keep the heat in and have three heat lamps shining on the hull. Also warming the epoxy in a sink full of hot water.
This "tent" thing didn't really do much to hold the heat in. I'm using a new-to-me brand of epoxy this time: Raka. I was worried that it wasn't curing, but it just cures much slower than the MAS.
Also made an odd discovery: 100 watt light bulbs actually heat the work up better than 125 watt heat lamps? It doesn't seem to make sense, but I found that the 100 watt bulb will raise the surface temperature from 60 to 70 degrees in an hour, where the heat lamp barely moves it.
Glassing the hull interior went about as usual, some ripples to sand out.
The skeg box in place. This was somehow easier than the last time, and it looks straight.
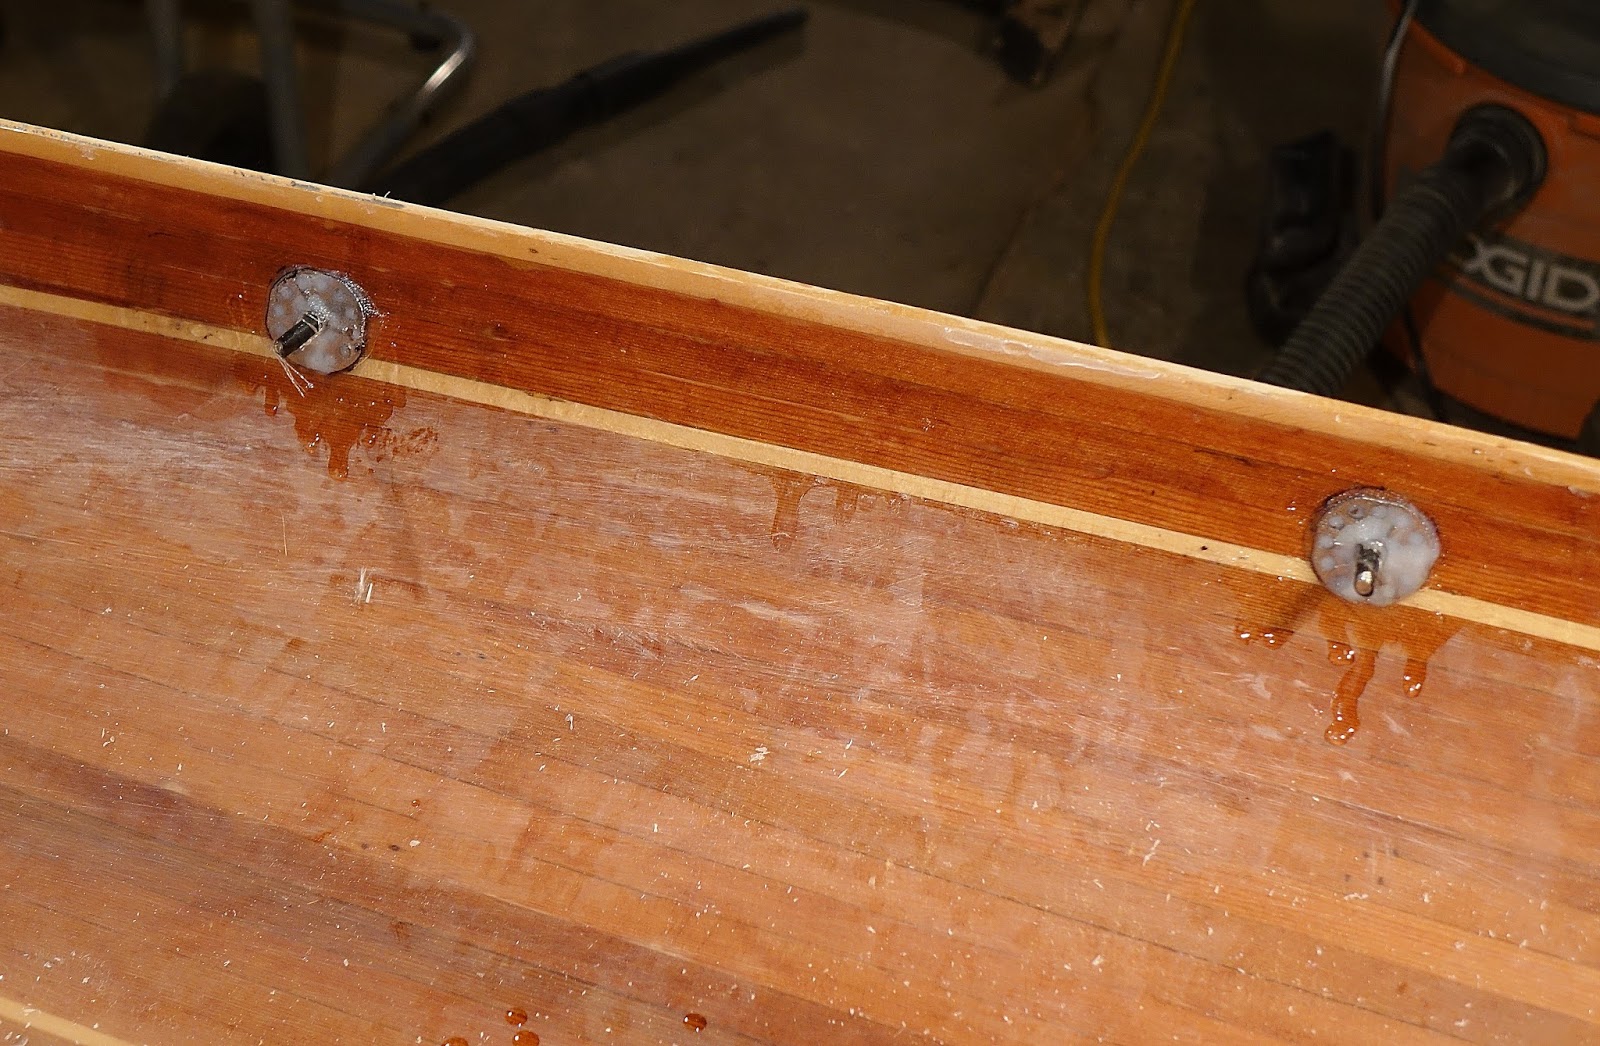
Foot brace mounting studs. I was stressing a little about the position of these, thought about it a little, and moved them 2" further aft than originally marked. I hope its right.
I was actually surprised at how nice the deck looked after fairing & sanding. The deck batch of cedar has a nice tan-red look, not exactly what I expected, but nice.
I decided to go for an inlay, and bought one from CLC. Routing out the recess was "fun" as usual-I even made a jig of Masonite to keep the router bit from plunging too deeply. That went well enough, but I had trouble making the inlay fit the recess precisely.
In any case, I have a nice bird to look at while paddling ;)
I (over) bought a new batch of cedar. I also discovered that my new Toyota has absolutely, positively, no place on which to hook a tie-down at the front or rear of the car! I resorted to making two loops of webbing attached to bolts under the hood & trunk lids. This seems to be the Standard Solution to the problem, but we shall see, come spring...
The second batch of cedar is of a lighter color than the hull batch, which I hadn't planned on, but I think it will look o.k.
I settled for a couple of narrow basswood strips for accents. I bought a nice veneer inlay for the foredeck.
The Obligatory Whisky Plank Photo-although in this case, its more like a Whiskey Sliver.
Stripping the deck went about as expected-tedious, painstaking work on the half-width strips that make the transition from vertical to horizontal, heat bending strips down to the deck, easy fits on the flatter sections.
I have also decided to build either a plywood or cove-and-bead cockpit coaming, instead of another molded fiberglass one. I want a plywood rim, because it seems to release the spray skirt more easily.